
The patch panel is an indispensable component of the network system. It serves as a static switchboard which connects a lot of devices to the central or critical hardware. Based on different application environment, patch panel can be classified into rack mount patch panel and wall mount patch panel. This article will focus on exploring the former: rack mount patch panel.
What Is a Rack Mount Patch Panel?
As a branch of the patch panel, rack mount patch panel is a mounted hardware assembly as well. It is generally constructed of steel, mental or plastic used in a home, enterprise networks and data center. What’s more, the rack mount patch panel consists of multiple ports to connect and manage the input and output fiber or copper cables. So it can provide a centralized location for users to manage connections.

Figure 1: rack mount patch panel cabling
Generally, the rack mount patch panel is available in two versions: rack mount fiber optic patch panel and rack mount Ethernet patch panel.
Rack mount fiber optic panel is commonly designed for standard 19-inch rack mounting. According to the number of connections required, it is usually available in 1U, 2U, 4U configurations with flat or angled design. For unloaded rack mount fiber optic panel, LC or SC fiber adapter panels or cassettes can be installed preferentially or during the deployment. While, for loaded rack mount fiber optic panel, fiber cables can be installed directly. According to the requirements of your project, you can choose a proper one flexibly.
The other type is the Ethernet Patch Panel, which is also called RJ45 rack mount patch panel or rack mount copper patch panel. It can be inserted with both shielded or unshielded copper cables such as Cat5e, Cat6, Cat6a, and Cat7. Besides, RJ45 rack mount patch panels are commonly available in 24 ports and 48ports.
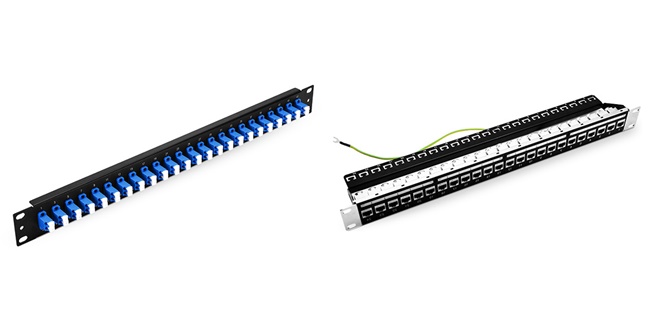
Figure 2: 24 ports 1U rack mount fiber patch panel (left)
and 24 ports 1U shielded Cat6 rack mount patch panel (right)
Why Use a Rack Mount Patch Panel?
As mentioned above, the rack mount patch panel plays an important role in network setups. The following highlights some of the advantages.
- Simple for cable management – With rack mount patch panels, all cables can be collected in one location. It offers the easy and organized management of the network cabling.
- Convenient for reconfiguration – Since cables are terminated on the patch panel, the networking hardware like switches won’t be disturbed when adding or removing some cables. And the patch panel’s ports are often labeled, which is easy for you to find the right slots. Therefore, it is convenient to make some changes of the cabling.
- Saving wear and tear – Because all of the connections are made with the patch panel that there is no need to plug or unplug the cables directly from the devices. Thus, using a rack mount patch panel also saves wear and tear on the input ports of expensive networking devices.
How to Use a Rack Mount Patch Panel?
Generally, there are three main steps for you to install a rack mount patch panel.
Before installation, the user should make some preparations:
- Evaluate the number of rack units that will be used.
- Determine the number and the size of the patch panel.
- Choose the jacks that you are going to utilize.
- Make sure the patch cords are matched to the installed cables.
When a pre-loaded rack mount is held, you can start installing a patch panel.
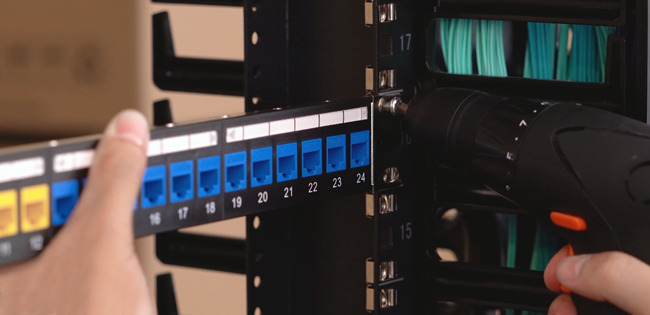
Figure 3: Installing a rack mount patch panel
- Hold the drawer of patch panel in an upwards position and push it forwardly.
- Attach the patch panel assembly to the rack with the appropriate machine screws.
- Insert each cable into the matching port and then use a strap to secure the cables. (Notice: For fiber optical cables, a Velcro cable tie is suggested to strap. While for copper cables, a Nylon cable tie is recommended.)
- Write specific information on labels for identification if you need.
After completing the second step, you still need to make a visual inspection to ensure all devices are in a safe environment. Then, the installation is finished.
Conclusion
The rack mount patch panel provides an ideal solution to optimize your network setups. When choosing rack mount patch panels, port density, rack size and space should be considered. FS provides various types of patch panels such as rack mount coax patch panel, RJ45 rack mount patch panel, etc. If you have any needs, welcome to visit FS.COM.
Related Article: How to Use Fiber Patch Panel for Better Cable Management


